There are no pages that do not have some sort of event going on in their circle. And, if you want to promote it and attract as many people as possible properly, you can always create an event on your Facebook business page.
As you know, an event is successful when many people with similar interests gather together. However, it is hard to do so if you don’t already have a proper connection.
But Facebook makes it very easy for you. If you have a business page, then you can always promote your event via this platform.
Similarly, it allows you to boost your event at a low cost. So, there is no need to worry about finding related people or advertising your events.
Hence, this article will teach you to create an event on your Facebook business page and give a few helpful tips. Meanwhile, let’s also learn to get a QR code for a Facebook page while at it.
Can you Create an Event on a Facebook Business Page?
Yes, you can easily create an event on your Facebook business page. It can be in person or virtual, as you want.
Just like in a personal account, Facebook also allows you to publish an event on your page. You can always create a one-time or repeating event, depending on the type.
This feature lets you quickly inform everyone about the details of your activities while inviting them.
You can also make a suitable banner for your event to attract attention. People can look at the details, location, host, and other information and express their thoughts if interested.
Once they join it, they will get a reminder in due time. This will help you gather audiences for your activities, especially if the event is virtual.
There are also features that allow you to sell tickets to your programs, add a website, and so on.
Hence, you should also create events on your business page for the promotion and visibility of your brand, better engagement, networking, special occasions, etc.
How to Create an Event on Facebook Business Page
Creating an event on a Facebook business page is very easy, and you can do it using a Smartphone and a PC.
Also, anyone with the Facebook access (Admin, Editor, Moderator, etc.) can set up an event.
So, let’s learn this process on both devices so that you can manage your page better.
On Mobile App
If you have access to a business page on your Facebook or Lite app, you can quickly create an event using an Android or iOS device. It is also easier to do so than using a PC.
So, let’s follow the step-by-step process below on your Mobile Phone to create/add an event on your Facebook business page.
1. First, launch the Facebook app, sign in, and then open the page account on your Smartphone.
You can find it by tapping the “flag” icon on the shortcut menu from your personal account.
Note: Remember, you must have Facebook access (not task access) to open the page.
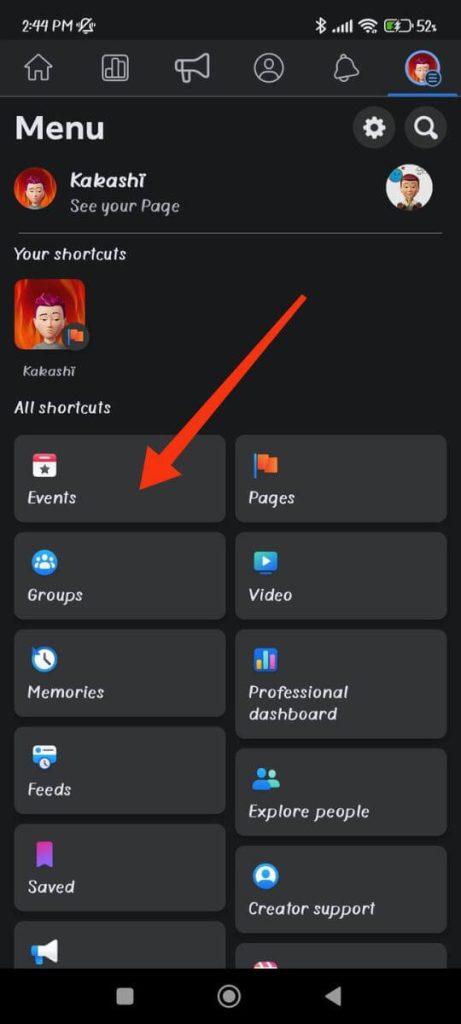
2. Tap the hamburger menu from the home screen once you are on your page account.
3. Next, select the “Event” option from the “All Shortcuts” section. You may sometimes need to press the “See more” button.
4. After that, tap the “plus” icon next to the “search” icon from the top right corner.
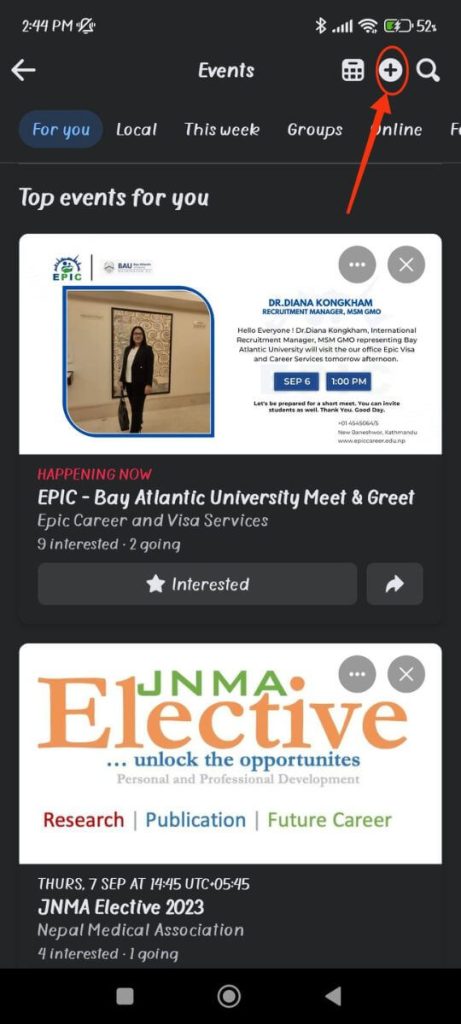
5. You will now come across the Create Event page.
So, first, choose a banner for your event. You can use your cover photo, pick a GIF, or press the “Upload” button to select images from your Gallery.
You can also tap the “Gallery” button on the banner to choose various pictures from Facebook.
6. Once the banner is ready, type the event name, start date and time, and end time (if any) on their respective field.
If the event is recurring, press the “Repeat event” button and then set the frequency to “daily” or “weekly.”
Now, you can choose your event type: in–person or virtual. The “in-person” type lets you add location to your event, whereas the “virtual” type lets you choose different meeting styles (live video, website, etc.).
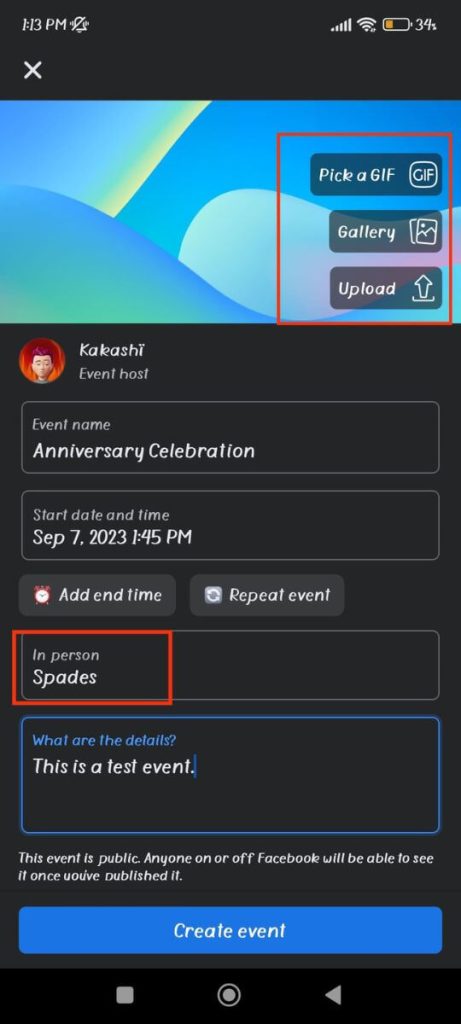
So, take your time and choose the correct one from the list.
7. You can now add a description of your events in the details section.
Cover every important aspect here since people will mainly look at this before making their decision.
Remember, an event made on a Facebook page is public by default and is visible to anyone on/off the Facebook platform.
8. Finally, your event is ready. Now, you can direct your attention to the management aspect.
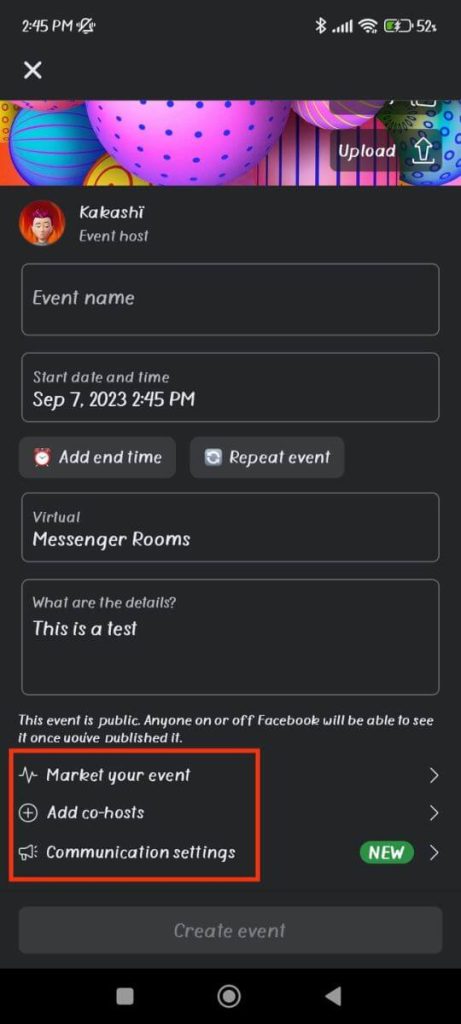
To add the category to your event, press the “Market your event” button and then choose it from the list.
If you want the help of other friends to manage your program, you can add co-hosts. You can add multiple of them if you want.
The “Communication settings” option lets you control who can post in your event. You can choose between the “Only hosts can post” and “Posts must be approved by host” options. If both options are off, any guest is eligible to publish content.
The last option, “Add tickets,” allows you to sell permits for your event. This is especially helpful in the case of an “in-person” event.
So, just tap this button and paste the link to your website that sells real-time passes. Next, press “Save,” and this will help direct the interested person to your website.
9. After you finish everything, press the “Create event” button below, and your event will be published immediately.
You can now invite your friends or share the event anywhere you like. You can also pin it to the featured section of your business page so that people can easily find it on your profile.
For this, just press “Manage” button and then choose the first option from the menu. Also, choose the “Promote” button from here if you want to use the money to advertise your program among more users.
On Desktop Web App
Follow the step-by-step guide below on your computer or laptop to create an event on your Facebook business page.
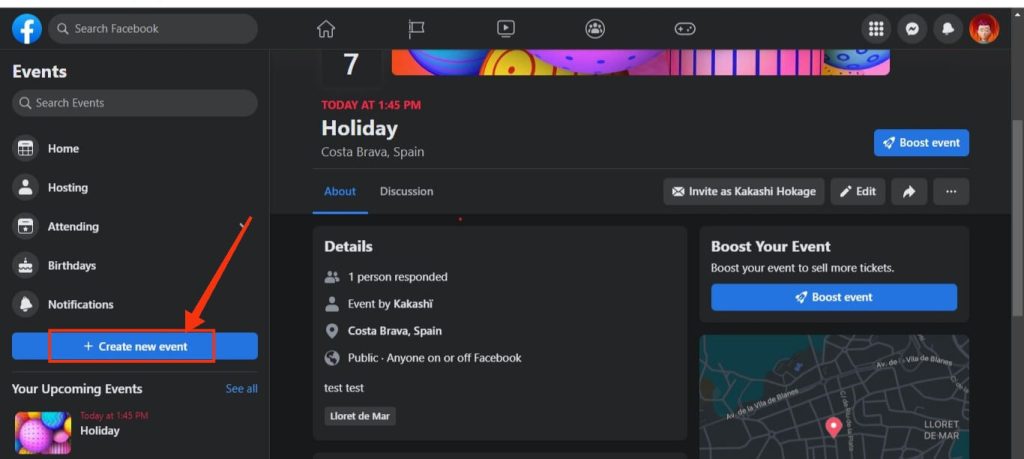
1. First, sign in to Facebook.com on your PC (Windows or Mac) and then go to your page account.
2. Once on your page, click the “see more” button on the left panel below the “Suggested” section.
3. Next, select “Events” and then press the “Create new event” button from your left panel.
4. After that, prepare your event as you like.
You can add a banner, name, date and time, type (in-person or virtual), details, etc.
Additionally, add a category, invite the co-hosts, fix the frequency, and edit the communication settings for your event from the options below.
5. Once all the editing is done, press the “Create event” button, and it will be published on your page immediately.
After doing all this, you can now invite your friends and followers, and promote via advertisement, and so on as you like.
How to Edit Your Posted Event on Facebook Page
Sometimes, you may make mistakes, or some things may need to be changed during an event. In such a case, you can edit your posted event easily.
For this, tap the “Events” option from the left panel (PC) or shortcuts (Smartphone).
Now, press the event on the “Your events” section and open it. You can also directly find it on your timeline.
Once you are on your event page, click the “Edit” button below your banner image. Now, modify the info as you like and press the “Save” button at last.
Note: For Smartphones, you can tap the “Manage” button and choose “Edit” from the menu.
How to Delete a Facebook Event You Have Created
To delete a Facebook event you created, first locate and open it on your business page account.
For this, you can either go to the “Event” section or find it on your timeline.
Using a PC:
Now, click the three dots at the right side of the horizontal menu below the banner image and choose the “Cancel Event” option.
Then, press the “Delete Event” option and then press the “Confirm” button. Your event will disappear from your page immediately.
Using a Smartphone:
Tap the “Manage” button and choose “Edit.” Next, press the “Delete” icon from the lower right corner.
You can now select the “Cancel and delete events details” option and press the “Cancel event” button.
Note: Remember that you can also only cancel your event instead of completely removing it from your page. This way, people can still see that event on your page with a cancellation notice. For this, you can choose the first option.
How to Create a Live Video Event on a Facebook Page
Live video event on a Facebook page comes under the “virtual” type. So, create a new event like before and add all the necessary info.
However, while choosing the type, select the “Virtual” option. Now, you will see many choices from Facebook.
Out of which, choose the “Facebook live” option and then press the “Create event” button.
Note: If you are using another platform than Facebook for your video chat, you can use the “External link” option and paste the necessary URL here.
Can you Create a Private Event on the Facebook Page?
No, you cannot create a private event on the Facebook page. A business page is, by default, public by nature.
Hence, you can use your personal account instead to host such private activities on Facebook.
Also Read: How To Report A Hacked Facebook Business Page?
What are the Different Categories for Facebook Events?
There are many categories for Facebook events, like classics, comedy, crafts, dance, drinks, foods, games, health, music, religions, etc.
After selecting the “Events” option on your business page, you can find them all on the left panel.
Additionally, you can add a category to your event by clicking the “Market your event” button on the editing page.
FAQs
You can’t create an event on a business page if you don’t have Facebook access or necessary permission on it. So, ask your Admin if you encounter any issues.
To invite a co-host to an event, press the “Add co-hosts” button on the editing page. Now, invite your friend from the list, and you will have an additional host if they accept your invitations.
Final Thought
In conclusion, the Facebook page has made creating and promoting any event you have more accessible.
So, you can use this tool to your advantage for free. And, if you want, invest a little money to advertise your program among many users.
Overall, hope this clears up your confusion. Let’s also learn to check Facebook page quality if interested.