There are many aspects that you need to care about when it comes to operating a business on social media. Out of them, real-time communication is the most important. So, learning to go live on your Facebook business page is very necessary.
Whether it is for real-time engagement, making an announcement, Q & A session, building trust, showcasing products or services, etc., you should know how to go live.
It is also an excellent feature that lets you host a giveaway program, promoting your page.
Furthermore, interacting with your followers through this feature will make you familiar with genuine members. This gives a solid foundation for building a superb community.
So, this article will teach you to go live on your Facebook business page, along with a handful of tricks. Let’s also learn to search within a Facebook business page if interested.
Can you go Live from a Facebook Business Page?
Yes, you can go live from a Facebook business page as long as you have the necessary permission and roles.
As you know, a page can give Facebook or task access to a person. Furthermore, Someone with task access can only open a business account in the Meta business suite app.
However, as long as you have content management rights (editor), you can still go live without Facebook access.
So, anyone with enough permission (Admin, Editor, etc.) can host the live streaming on a business page.
Of course, preparing everything clearly before hosting such events is still necessary.
If your video quality is terrible and you are without any strategy, such action can, in turn, affect the page’s trust and prestige.
Hence, an Admin should make a rule regarding this live video engagement. Sometimes, creating a separate team to handle such things is better if the page has many followers and popularity.
Also, a notice before the live streaming is a must. Furthermore, you should also do your research about the time and place of such events since going live at midnight makes no sense.
Overall, though it is possible to go live with your Facebook page, it is still necessary to make a proper strategy. Don’t let anyone with permission start it immediately without care to avoid embarrassment and affecting your business.
Also Read: How To Find An Admin Of A Facebook Page?
How do you go Live from a Facebook Business Page
As you know, you must have enough permission to manage content on a page to go live on Facebook.
Though it isn’t necessary to have Facebook access, at least you should have permission to publish content, add comments, etc., on a page.
If you have such rights, you can quickly go live on Facebook (or Meta business suite) using a Smartphone or a PC ( Windows or Mac). So, let’s learn it using both devices for your convenience.
On Mobile App
Follow the step-by-step process below on your Android or iOS (iPhone or iPad) device to go live on a Facebook business page.
1. First, sign into your main account on Facebook or the Lite app using your Mobile phone.
2. Next, switch to the Facebook business account.
For this, tap three horizontal lines from the top (Android) or bottom (iOS) and select the flag icon (pages) from the shortcuts menu.
Note: If you don’t have Facebook access to a page, you can download the Meta Business Suite app on your device to manage the business account.
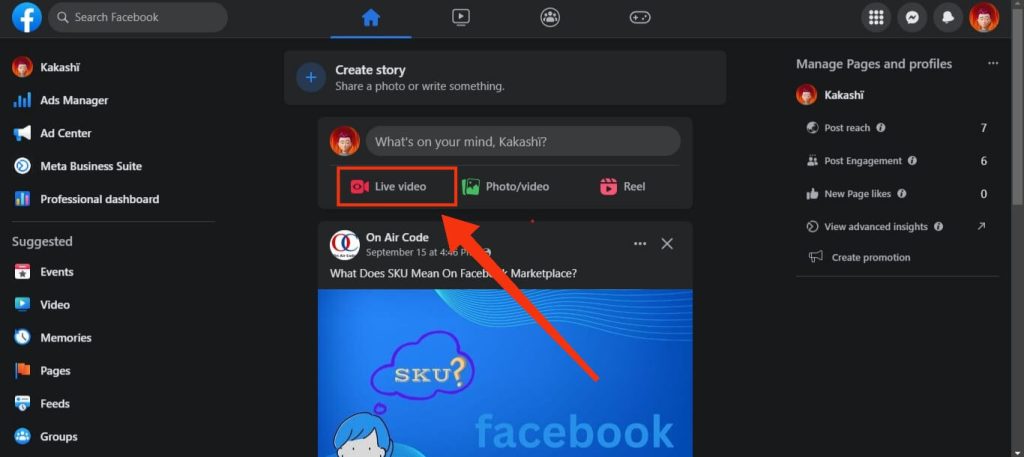
3. After you open your page account, tap the “What’s on your mind?” box from the home screen.
4. Then, press the “Live Video” option or icon from the bottom of your “Create Post” screen.
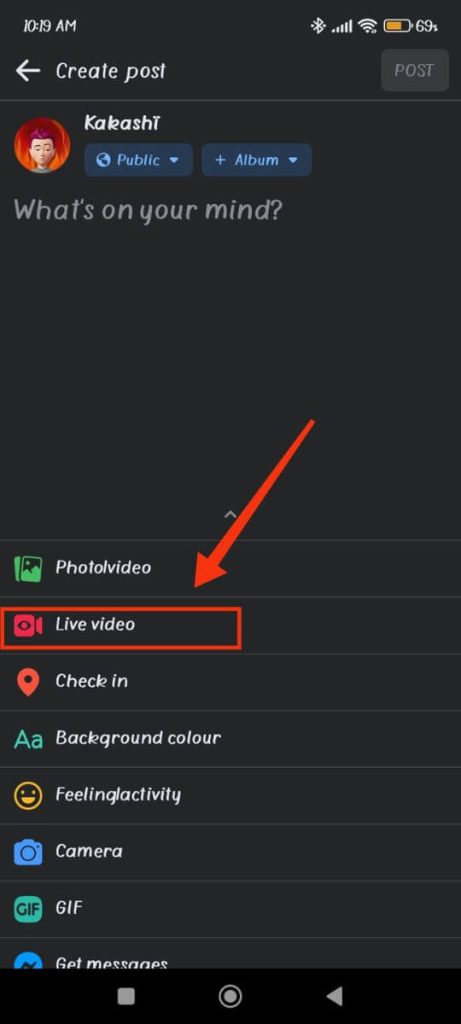
You should now give your Facebook application the necessary permission (camera, audio, file storage, etc.).
5. Before going live, let’s adjust everything and apply some effects if necessary.
There are many valuable features for live streaming on Facebook. You can find them on the right side (verticle menu) and bottom side (horizontal menu).
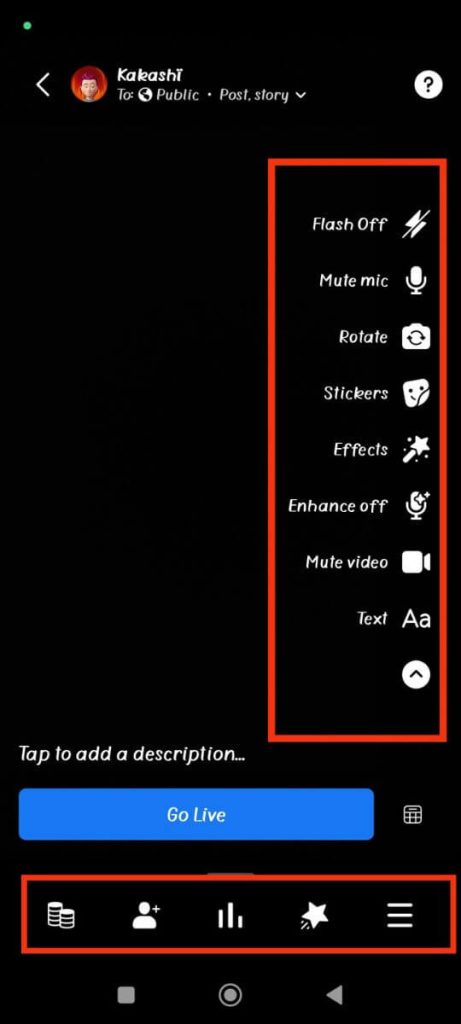
From the option available on the right menu, you can use a flashlight, turn on/off your mic, rotate your camera screen, apply stickers, add text, and many more.
You should go through each option on this menu since there are various helpful features.
Likewise, the bottom side horizontal menu is related to the management aspect of your live streaming.
The stack of coins icon at the bottom left corner allows you to enable monetization on your live streaming. So, if it is available on your business page, use this option.
Additionally, you can invite guests to your live video by tapping the friend icon below.
Likewise, other remaining icons allow you to create a poll, enable stars, and edit the settings.
If you want to share your live streaming on your story, press the drop-down menu from the top and enable the “share to story” option.
Additionally, press the “Tap to add a description” text from below and write a caption for your video. You can describe what your steaming is about and other important things.
6. Finally, press the “Go Live” button from below once all the editing is done. Now, the timer of 3 sec will start, and you will go live immediately.
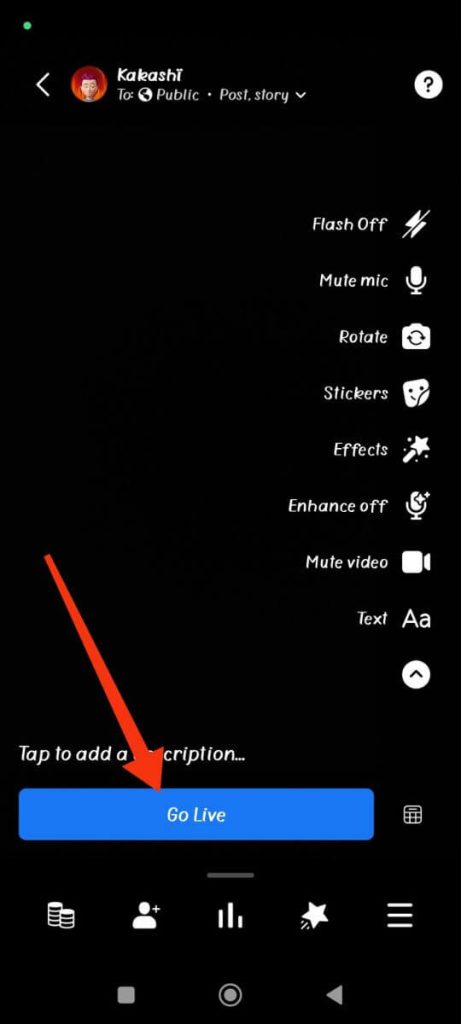
Make sure your mic and environment are clear and working before pressing this button.
Note: You can see if you are live or not by looking at the “Live” red text at the top left corner.
If you want to stop your stream due to any error, just press the “Mute video” option from the right menu. You can expand this menu by pressing the downward arrow.
Remember, comments on your stream will appear at the bottom of your screen. So you can look at it and reply in real time.
7. Now that your live streaming is coming to an end, press the “Finish” button at the bottom right corner.
This will immediately stop the steaming on your business page. However, your steaming will still be available on your timeline, and people can view it afterward on their news feeds.
On Desktop Web App
Follow the step-by-step instructions below on your computer or laptop to go live on your Facebook business page.
1. First, open the Facebook account on your desktop web browser and click the profile icon from the top right corner.
2. Next, press “see all profiles” and select your page account.
If you don’t have Facebook access, you can go to “pages” by clicking from the left panel. Now, open the page on Meta Business Suite.
3. After that, hit the “Live Video” button below the “What’s on your mind?” box on the homepage.
Note: You will also find this button at the top right side of your Meta business suite.
4. Now, you will see two options on your right side: Go live or Create a live video event.
So, press the “Go live” button. You can enable the “test broadcast” feature if you want to test first.

Note: You can decide where to post your stream from the option available on the left panel.
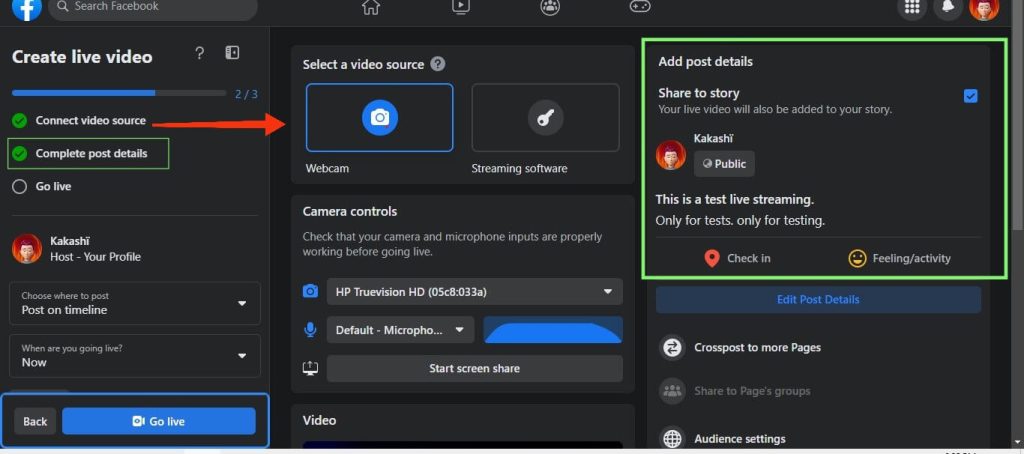
5. Unlike on a Mobile phone, you must complete three steps before going live.
You can see these steps at the top left panel.
So, first, connect your video source. You can choose between Webcam or Streaming software from the right panel as per your setup.
Once the video source is correct, you will see a green tick on the left panel.
So, complete your post details to complete the second step. Go to the “Add post details” section on the right panel and add a title plus a description of your stream. Use other options if necessary.
Now, two out of three options on the left panel will show a green checkmark.
6. Finally, press the “Go live” button from the bottom side of your left panel.
Your business page is now live. You can engage with your audience easily in real-time.
After finishing the stream, click the red “End live video” button from the bottom left corner.
Note: Unlike on a Smartphone, you have more features and options available to go live using a PC (Windows or Mac). You can even use different steaming setups and edit audio. So, take your time exploring the features.
Can You Go Live on Two Facebook Pages at Once?
Yes, you can go live on two Facebook pages at once easily. For this, you need to use the cross-posting feature.
So, follow the steps below on your PC (Windows or Mac) to do this.
1. First, open the FB page account where you want to go live and go to Settings & Privacy >> Settings >> Videos.
2. Next, scroll down to the cross-posting section on the right panel.
Now, enter the username of your other page and press Enter. Finally, allow cross-posting under the “live video” option from the prompt.
3. Now, open another page account on your device and accept the invitation from the notification.
Note: Ask your friend to accept it if you aren’t Admin on that page.
After that, repeat the same steps above and add the first page to the cross-posting list. You need to do this to allow sharing of live videos using any page account.
4. Once your page is on the cross-post list on another page, you can go live effortlessly on two pages at once.
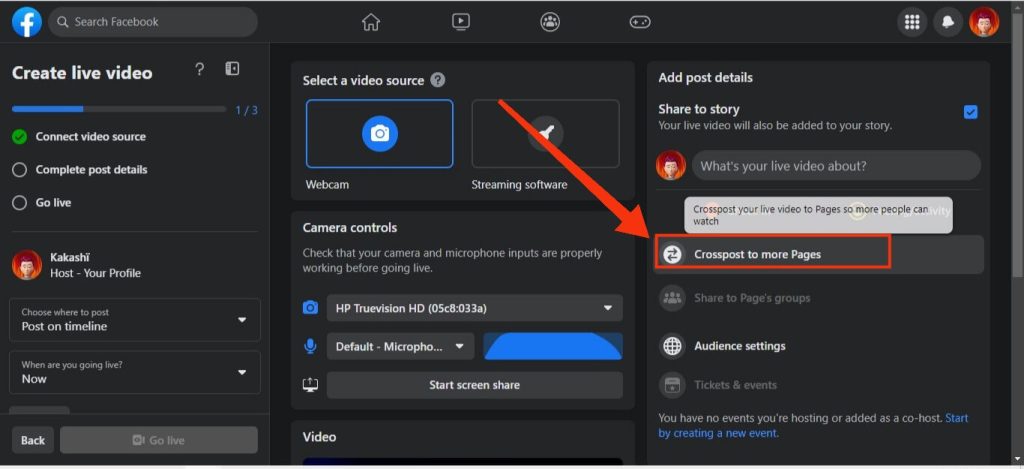
For this, press the “Cross post to more pages” option from the right panel of your “Create live video” page.
5. Now, select that page from the list and press “Continue.” That page will be added to this feature immediately.
Hence, once you start your live streaming on one page, it will also automatically start on another one.
Depending on the settings, the Admin may need to accept the invitation.
Note: You can also use the “invitation” feature to publish your stream on many accounts.
How long does Facebook Live Stay on your Page?
You can stay up to 8 hours on Facebook Live on your page. You can do this using a Mobile phone or streaming software on a PC.
After 8 hours, your live streaming will automatically stop. Of course, your live video will still be published on your timeline, and people can view it again afterward.
Also Read: How To Add Phone Number On Facebook Page?
How to Delete a Live Video from a Facebook Page
To delete a live video from a Facebook page, follow the steps below on your device.
1. First, go to the timeline on your page profile and tap three dots from the top right corner of your live video.
2. Next, select the “Delete video” or “Move to recycle bin” option.
3. Once you confirm the prompt, your live video will be removed immediately.
You can also directly delete the video once your live streaming ends by tapping the delete icon.
Can Others Download your Facebook Live Video?
Though there is no option on Facebook that lets others download your live video, it is still possible to do this using a few tricks.
People can easily download your clips using third-party websites like FDown.net or apps like Friendly Social Browser, Mymedia, etc.
However, your video is protected under copyright law, and people cannot use it for commercial purposes without your consent.
How to Go Live on Facebook Page for Event Video
To go live on the Facebook page for the event video, first, click the “Live Video” option on your “What’s on your mind?” section.
Now, press the “Create event” button from your right panel. This will allow you to make live video events easily.
If you are using a Smartphone, press the calendar icon next to the “Go live” button below.
Next, create your event, type the name, descriptions, etc., and schedule it accordingly. Finally, press the “Create event” button below.
How to Pin Comment on Facebook Page Live
To pin a comment on the Facebook page live, toggle on the “Enable preset pin comment” option from the right panel of your editing page on a PC.
You can now type a comment, and it will get pinned at the top once the live streaming starts.
If you are using a Mobile phone, first start your live stream, press the comment icon from below, and type what you want.
Now, tap and hold that comment and choose the “Pin this comment” option from the menu.
You can also do this to pin another person’s comment on your livestream.
How to Recover Deleted Live Video on a Facebook Page
To recover the deleted live video on your Facebook page, you can follow the steps below on your device (Smartphone or PC).
1. First, open your page account and tap the profile icon from the upper right corner.
2. Next, go to Settings & Privacy and find the Activity log on your business page.
For Smartphones, go to Settings & Privacy >> Settings >> Page Settings >> Activity log.
3. After that, choose the “trash” option from the left panel.
Tap the “recycle bin” button from the top if you are using a Mobile Phone.
4. Finally, press the three dots next to your live video on the right side and choose the “Restore to profile” option.
Once you hit the “Restore” button on the prompt, your clips will reappear on your timeline immediately.
FAQs
You cannot go live on your Facebook business page due to technical issues (camera, streaming setup, etc.), permission restrictions (audio, video, etc.), and insufficient page roles.
To solve this, check your roles, give necessary permission to Facebook, and use a quality camera and streaming setup.
Someone who has enough permission to manage and publish content, like an Admin, editor, etc., can go live on the FB page.
Yes, people who have liked or followed your page will get immediately notified when you go live unless they have disabled the notification.
The live button on your Facebook page may be missing due to technical issues, having too many broadcasts going on, partial restriction on your page due to violation of guidelines, and so on.
Wrapping Up
In conclusion, you can go live on a Facebook business page easily as long as you have enough permission.
However, you should always be careful when using this real-time engagement feature. Make a script and a plan before beginning your stream, and notify your followers ahead of time.
Overall, that’s all you need to know on this topic. While at it, let’s also learn to add an editor on the Facebook page.